Wednesday, September 25, 2013

Macrobiotic Bowl

The first time I heard about the macrobiotic diet, I was watching some stupid show on E! that was all about Madonna. I remember them saying how she follows a strict macrobiotic diet that was supposedly one of the reasons why she's essentially ageless (of course, another reason has to do with plastic surgery, but we all know that). I was probably in early high school and at that time, my fascination with food and nutrition was just beginning. The show prompted me to research the macrobiotic diet and I remember marveling about how healthy it seemed. I knew that I would never strictly follow the macrobiotic lifestyle (it seemed a bit restrictive), but adopting certain aspects of the diet seemed like a healthy thing to do. Macrobiotics resurfaced for me a few more times since that Madonna episode while I was taking an alternative healing class in college and while reading one of my favorite nutrition books, Healing with Whole Foods. Since the macrobiotic way of life is primarily rooted in Asian culutre, namely Japanese, that may explain my deep love for Japanese food culture.
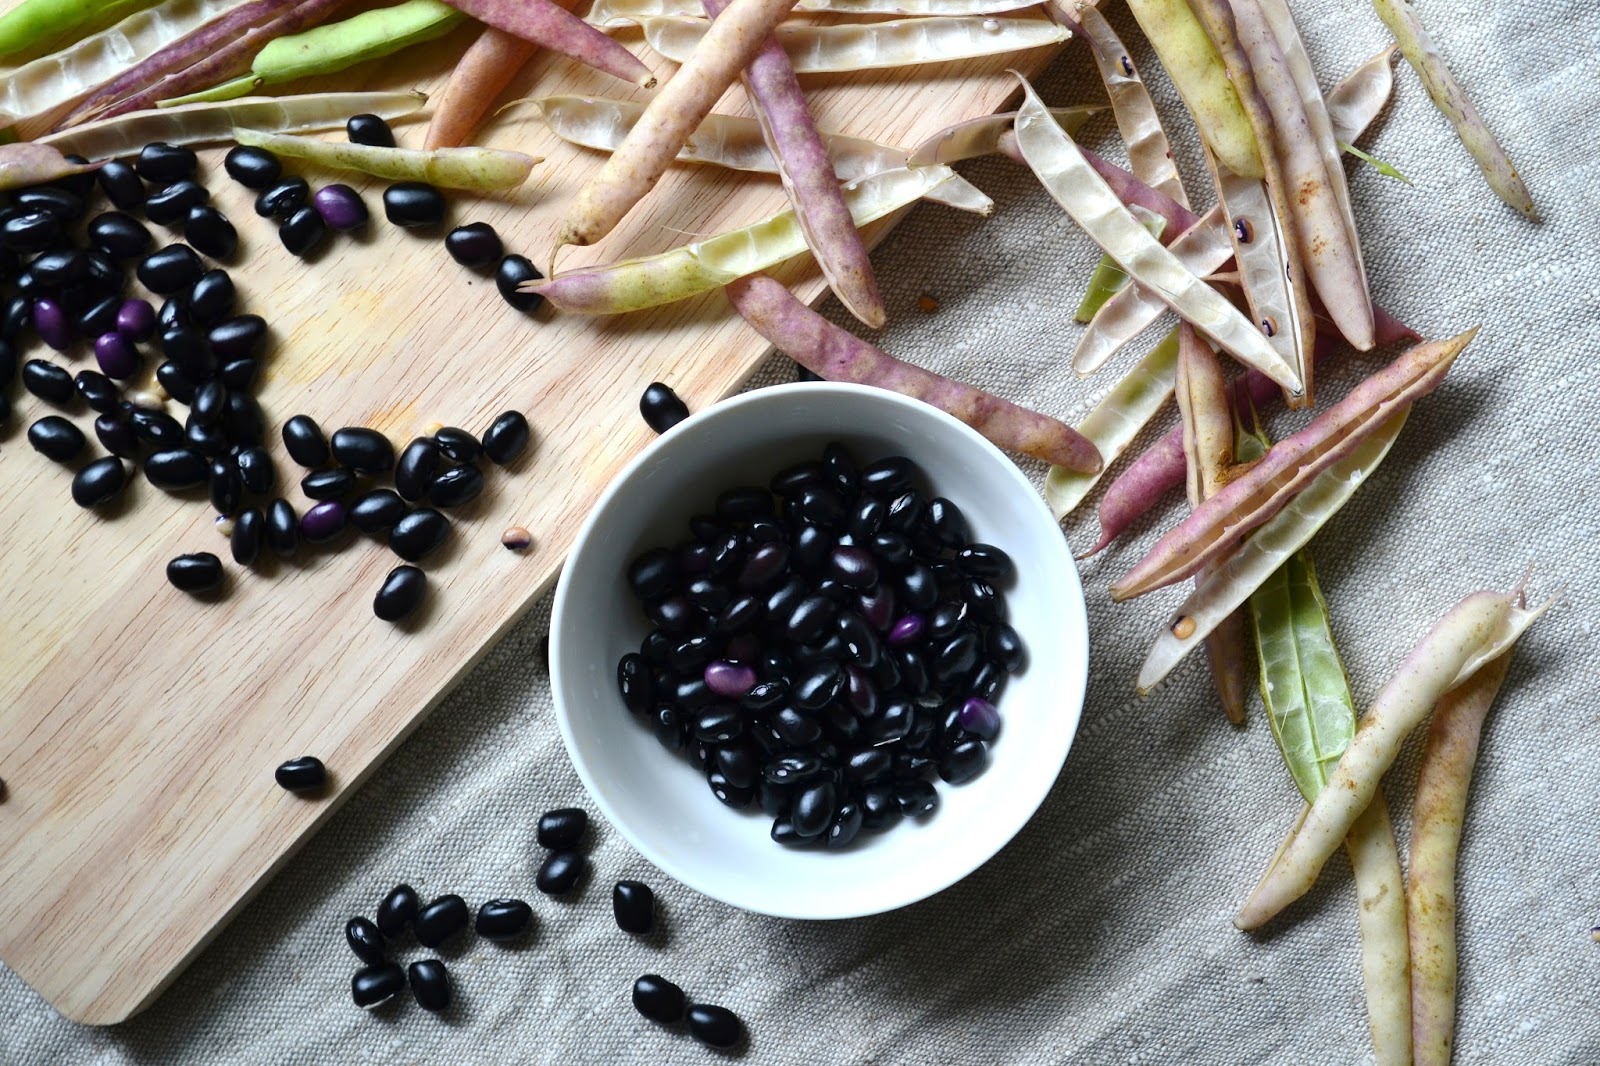
I'm not going to try to explain all of the ins and outs of the macrobiotic way of life here. Firstly, because I'm no expert on the subject, and secondly, because if I did, this blog post would be way too long. In a nutshell, the diet embraces whole foods prepared in traditional ways. Whole grains (primarily brown rice), vegetables (including sea vegetables), beans, fermented soy, and soup (such as miso) form the bulk of the diet. Fish, nuts, seeds, and fruit also make up the diet, but in smaller amounts. The diet is great for times of healing or cleansing, but strictly following the macrobiotic diet for long periods of time may lead to nutritional deficiencies if not carefully planned. I was in the mood for a simple meal the other night, one that also happened to showcase my gorgeous fresh black beans. This macrobiotic-inspired bowl came to mind and within minutes, I had a satisfying dinner.

Macrobiotic Bowl (serves 2)

2 1/2 cups cooked brown rice
1 cup cooked black beans
1 large clove of garlic
1 small piece (about 1 inch) fresh ginger
2 carrots
small bunch of kale
avocado
kimchi (see my recipe for amazing kimchi here...but this kimchi pictured is from here) or pickled ginger
black sesame seeds for garnish
splash of brown rice vinegar, toasted sesame oil, tamari or soy sauce
one sheet of nori seaweed, cut or torn into small strips

1. Distribute cooked rice and beans between two bowls. Set aside.

2. Chop the garlic. Peel and chop the fresh ginger. Set aside. Julienne the carrots (or shred/grate them). De-stem the kale and chop into thin ribbons. Set aside.

3. In a large frying pan, add some sesame oil (or any oil of your choice), chopped garlic, and ginger. On medium low heat, warm the garlic and ginger until it just begins to be fragrant. Add the carrots and kale and a pinch of salt. Stir continuously just until the kale begins to wilt. Remove from the heat.

4. Add a splash of brown rice vinegar, more salt, and a touch of toasted sesame oil, or even some tamari, to the greens. Season to taste. Arrange the greens in the bowls with the rice and beans. Top with kimchi or pickled ginger, nori, avocado. Sprinkle with sesame seeds. Enjoy with Japanese green tea, if you have some.


For more fabulous food and photos from Nourish The Roots, 
be sure to follow on Facebook, Instagram, and Pinterest

Sunday, September 22, 2013

Root Vegetable Lentil Stew with Kale


I can't believe today is the first day of fall. It seems like just yesterday I was watching fireworks on the fourth of July.  I guess I need to accept the fact that it's just going to get colder from here on out, so I might as well make the best of it. Fall calls for soup, of course! I make lentil soup all the time. Yep, even in the summer. I probably have fifty different versions of lentil soup using various types of lentils and vegetables and you know what? I love them all. Lentils are so satisfying and nourishing.
Fall is also the time to eat root vegetables. These sweet, nutrient-dense vegetables are what our bodies crave during the cooler weather. Root vegetables absorb and store insane amounts of minerals and other nutrients through the soil in which they grow (all the more important to buy organic). They're high in vitamin C, beta carotene, potassium, phosphorus, magnesium, and complex carbohydrates. In traditional Chinese medicine and Ayurvedic medicine, they're considered "warming" foods that nourish the body. Paired with warming spices, like the ginger and cardamom in this stew, root vegetables are incredibly comforting on chilly days.
As I currently write this post, it's pouring outside. It's cold and cloudy and pretty miserable, really. But I've got a batch of root vegetables roasting in the oven smelling delicious. And I've got some gorgeous winter squash sitting on my countertop just waiting to be made into some delicious meals. A variation of this soup will be one of them, for sure.
The recipe for this root vegetable and lentil stew is the part of my contribution (see my first contribution here) to the fitness and healthy lifestyle website called Life by DailyBurn. Check out this recipe, plus many more over on their site. You certainly won't be disappointed.

Recipe: Root Vegetable Red Lentil Stew with Kale


For more fabulous food and photos from Nourish The Roots, 
be sure to follow on Facebook, Instagram, and Pinterest

Thursday, September 19, 2013

Quinoa Stuffed Tomatoes


I can't believe that I went this entire summer without posting a legit recipe showcasing tomatoes (tomatoes on avocado toasts don't exactly count). That doesn't mean I haven't been eating them and enjoying them to their fullest. And I'm sitting here holding back my tears because I realize that very very soon, there won't be any more tomatoes at the farmers market until next summer. Sigh.
I've made a version of stuffed tomatoes on the blog awhile back and you can check that one out here. That recipe is a bit simpler and lighter. Today's recipe is more substantial and these tomatoes are just about a meal on their own, especially if they're served with a heaping plate full of garlicky kale. Feel free to get creative with the quinoa stuffing. You can't really go wrong with it. Add some caramelized onions or roasted red peppers to it. Yum. Or I'm thinking you could even do a Mexican style version of these tomatoes with a brown rice and black bean stuffing. I'm picturing some cilantro, fresh corn, chili, and cumin topped off with a nice sprinkling of cheddar cheese. Hmmm...might have to go try that while I can still get tomatoes at the market! Either way you stuff them, they're going to be delish. I can guarantee it.
Depending on how many tomatoes you choose to stuff and how large they are, you may have leftover stuffing. That's ok because this stuffing is excellent on its own served over a bed of mixed green lettuces.
Quinoa Stuffed Tomatoes
For the Quinoa Stuffing:
1 1/2 cup cooked quinoa
1 cup cooked chickpeas
1/2 cup chopped sundried tomatoes
2 cloves garlic, finely chopped
1/2 cup fresh basil, chiffonaded
1 tsp dried oregano
2 tablespoons capers
1/4 cup pitted kalamata olives, chopped
sea salt and black pepper, to taste

6-8 medium sized tomatoes
freshly grated Parmesan cheese (optional)
olive oil

1. Combine the stuffing ingredients in a large bowl and mix well. Taste and adjust seasoning. Don't be afraid to add salt...it makes the flavors pop! Set aside.

2. Preheat oven to 375. With a sharp knife, gently cut out the stem portion of each tomato. Then, with a spoon, gently scoop out as much of the seeds as possible, being careful not to split the tomatoes or poke through the bottom of them. (Note: I added the seeds of the tomatoes straight to the quinoa stuffing mixture to add moisture and because I didn't want to waste any part of my beloved tomatoes!)

3. Gently stuff each tomato with quinoa mixture, again making sure you don't split or poke through the tomatoes. Put them in a baking pan. Drizzle them with olive oil and top them with freshly grated Parmesan cheese if desired. Bake for about 30 minutes. Remove from the oven and serve with a bit more cheese.


For more fabulous food and photos from Nourish The Roots, 
be sure to follow on Facebook, Instagram, and Pinterest

Wednesday, September 18, 2013

Some Thoughts on Black Beans in the Pod

I consider myself pretty connected to and conscious of where my food comes from. I choose to eat whole foods that have been minimally processed (and hardly anything packaged). I purchase the majority of my vegetables and fruits from local farmers markets. I eat local free range eggs from chickens that roam in grass all day. And I know that the wild salmon I ate on Sunday was probably caught in the icy cold waters of Alaska the day before (one of the perks of living in Seattle, for sure). Yeah, so I guess you can say I'm a conscious consumer. But far from perfect.

Granted, I don't own a farm, I don't have an enormous garden where I grow all my own food, and I don't have any backyard chickens (somehow, I don't think my landlord would approve of chickens roaming around my nonexistent plot of grass). I admit that I live in a city (albeit a very environmentally friendly and food-focused one), and that limits me a bit. Even though I can easily travel 30 minutes to a local farm to see food grow, I can't say that I'm immersed in the growing process.
I was awakened to all of this the other day when I came across these fresh-as-fresh-can-be black bean pods at the farmers market. I was giddy with excitement...almost in awe of them. Of course I knew that black beans grow in pods. But my only experience purchasing black beans had been scooping them out of bulk bins at my natural foods store. To many other people, the only black beans they know of come out of a can. As a nation, we have become disconnected to where our food comes from and it's sad.
Besides being overly excited about these black bean pods, I realized that to a certain degree, I will always be disconnected from what I eat. There's no way I can know where everything that graces my lips comes from or who grew it. But I can become more conscious of and to be grateful for the food that I do choose to eat. And I think that buying these black beans, taking the time to remove them from their pretty pods to lovingly prepare them certainly put that into perspective for me.
I don't have a recipe for you today. I just felt like writing about how these beans made me feel. Call me a food nerd. I don't mind. But be sure to stay tuned because you can be certain that I'm going to make something delicious with these black beans...and of course I'm going to share it with all of you!


For more fabulous food and photos from Nourish The Roots, 
be sure to follow on Facebook, Instagram, and Pinterest

Sunday, September 8, 2013

Vanilla Almond Chia Breakfast Pudding

You know when you have a surprise for someone and you really really want to tell them what it is because it's just so exciting? Well, I've been wanting to share some exciting news with you all for the longest time and now I finally can! I'm going to be a guest recipe contributor for an amazing healthy lifestyle website called Daily Burn and this is my first post for them! This is the start of what I hope to be an incredible journey of sharing my nourishing recipes with the world and I'm beyond thrilled about it. You can check out the recipe for this luxurious chia breakfast pudding (plus my recipe for homemade almond milk) over on their site, plus read little bit about the incredible little chia seed. Enjoy!

Recipe: Vanilla Almond Chia Seed Pudding


For more fabulous food and photos from Nourish The Roots, 
be sure to follow on Facebook, Instagram, and Pinterest

Thursday, September 5, 2013

Rose Hip Tea


It's amazing what I find on my walks around my neighborhood. I'm lucky enough to live in a place where blackberry bushes are literally everywhere and fruit trees grow on almost every street. We're talking figs, various varieties of plums, apples, and pears. Gorgeous curbside gardens overflowing with kale, chard, and tomatoes are the norm. Artichokes are growing on street corners. Seriously people, I live in a city that's full of incredible food! And the best part is that gardeners are willing to share it! It's pretty freaking awesome if you ask me. Just the other day, I came home with at least eight pounds worth of fruit just picked from some neighbors' trees. I'm a lucky girl.
On one of my walks yesterday, I came across a gorgeous wild rose bush that was bursting with these gorgeous ruby orbs. They're called rose hips, and while they may not be the first to come to mind when you think of edible fruits, they certainly are a fruit that's worth looking for. Rose hips are the fruits that develop from the rose blossoms after their petals have fallen off. Cool, right? Heck, I'd take a bouquet of rose hips over the their flowered counterpart any day!
So why should we be eating rose hips? Well, upon doing a little research, I discovered that these little red fruits are incredibly nutritious. Apparently, just a single teaspoon of rose hip pulp provides more Vitamin C than an orange, making it an excellent immune system booster. Rose hips are also incredibly high in beta carotene (thanks to their incredible reddish-orange color). Beta carotene is essential for maintaining gorgeous skin and healthy cells. It's astonishing how high the antioxidant content of rose hips is! I even read that rose hips are clinically proven to improve symptoms of rheumatoid arthritis. Those are some powerful fruits, I tell ya.

Rose hips can be eaten fresh (after the seeds have been scooped out) or they can be dried and stored for later use. I've seen recipes for rose hip jams, syrups, and tinctures. In fact, there is even a traditional Swedish rose hip soup that is quite popular during the cold winter months to help fend off colds and flu. Here, I chose to make a simple rose hip tea to really enjoy their health benefits. Depending on the variety of rose, the hips will vary slightly in appearance and flavor. The rose hips I found were from a rugosa rose bush, which is known for having the biggest, most vibrantly colored rose hips. Overall, they have a mildly tart taste and remind me a bit of the flavor of cherry tomatoes.
 There are a few ways to make rose hip tea. I chose to steep the rose hips in a teapot of boiling water for about 20-30 minutes, but you can also simmer them on the stove in water for the same amount of time until they break up and form a pulp. Either way works, just strain the pulp before drinking the tea. And of course, you can eat the pulp, as well!

Fresh Rose Hip Tea (makes 2 cups)
10-12 fresh rose hips, seeds removed
2 cups boiling water

1. Put the rose hips in a teapot or French press. Pour boiling water over them, cover, and let steep for your desired amount of time. (See note above).

2. Strain through a fine mesh strainer or push the plunger of the French press.  I pressed on the rose hips to release more of their goodness. Sweeten the tea with honey, if desired. And eat the rose hips, if you'd like an extra boost of Vitamin C!


For more fabulous food and photos from Nourish The Roots, 
be sure to follow on Facebook, Instagram, and Pinterest