Thursday, March 28, 2013

Easy Homemade Kombucha

If you told me two years ago that I'd be brewing my own kombucha regularly, I would have laughed in your face. Sure, at that time I loved to drink kombucha and knew about its health benefits, but the thought of making it in my own kitchen scared me. It seemed too complicated. And what if something went wrong? And where on earth would I find myself a starter culture, also known as a "mother", mushroom (because of the way it looks), or SCOBY (symbiotic culture of bacteria and yeast). Yeah, at that time, I was perfectly content with buying bottled kombucha in the health food store and had no desire to make it myself.
Let me back-track a little. Many of you know what kombucha is. You may be avid drinkers of this probiotic tonic. Maybe you, too, make it at home. But I know there are many of you out there who haven't the slightest idea what I'm talking about here. What the heck is kombucha? Why on earth would you drink fermented tea? And why does that mother-scoby-starter culture thingy look like a placenta?! Fear not, my friends, I'm here to explain what this whacky tea is and why I'm obsessed with it.

Now, I don't claim to be an expert on the subject of kombucha. There's something really awesome called Google that can show you the many people in the world who are and they can answer questions about it far better than I ever could (and I link to them at the bottom of this post). So I'll keep it simple here. Basically, kombucha is tea sweetened with sugar, which then gets a starter culture (aka mother, scoby, or mushroom) added to it. This mixture of tea, sugar, and culture then ferments. As it ferments, the culture basically digests the sugar (making the beverage practically sugar-free if feremtned long enough) in the tea. Over time (about 7-10 days) you are left with a probiotic-rich, crazy healthy, and bubbly drink, which tastes a bit like fizzy vinegar. Yup.
Kombucha has been around for over two thousand years. The Chinese called it "the immortal health elixer", and for good reason. Kombucha has crazy amazing health benefits, including the ability to detox the body. It actually contains beneficial enzymes that aid the body through its natural detoxification mechanisms! And because kombucha is teaming with beneficial bacteria and yeast (it's a probiotic beverage), it dramtically aids digestion, which in turn benefits every single part of your body. After all, true nutrition can only be obtained when we have impeccable digestion and healthy gut flora. Because of these properties of kombucha, plus its high antioxidant content, this beverage is most definitely immune-boosting, as well, and can help fight off a wide variety of illnesses and ailments.
I think the best tip I can give you to successfully brew your own kombucha at home is to get yourself a quality symbiotic colony of bacteria and yeast (SCOBY) from a reliable source. I bought mine here in Seattle from a local kombucha-brewing company called CommuniTea and it is healthy, thriving, and producing some awesome kombucha. Another important tip is to use organic tea and organic cane sugar. Your kombucha SCOBY will be using both of these as food, and you want your culture to thrive without any toxic chemicals found in conventional tea and sugar. I use organic gunpowder green tea and organic cane sugar to make my kombucha and the results have been amazing.

Since I don't consider myself an expert on kombucha making, I'm not going to provide my own recipe here. Instead, I'm providing you with links to the most reliable sources for all things kombucha. These resources helped me tremendously when I started my kombucha-brewing journey, and they also provide answers to any and all possible questions relating to the subject of kombucha. You can even buy your own SCOBY online from this well-respected company if you don't have a nearby source for one.

Kombucha Resources:
Kombucha Kamp- This website provides all the information you need to start making your own kombucha. You can even buy your SCOBY from here and a starter kit to help you get started.
CommuniTea-This is the company I bought my kombucha SCOBY from and here is the recipe that they use to make their amazing, traditional, kombucha. A must-read!
Nourished Kitchen- Excellent read about kombucha, plus it provides more links for further reading.
YouTube-Watching videos about kombucha-making finally motivated me to make my own. Just watching videos is enough to greatly boost your knowledge and get you on your way.


For more fabulous food and photos from Nourish The Roots, 
be sure to follow on Facebook, Instagram, and Pinterest

Friday, March 15, 2013

Double Broccoli Quinoa


I want to admit something to you all. Food blogging is work. It's time consuming. It's messy. It's not as glamorous as it may seem. I mean, have you seen some of the gorgeous blogs out there? They're incredible and I strive to do work that's even half as good as them. But the truth is, I'm still learning. And I'm not even close to perfect. The last thing I want you all to think is that my kitchen is spotless all the time and that every meal I make is picture worthy. Because it's not. At all.
First, there's the hilarious sight of me balancing on a kitchen stool trying to get that perfect shot while almost falling face first into the plate of food. Seriously, one day I will come crashing down and break my nose. Typically, when I photograph a recipe, I take about fifty to sixty photos. I go through each one, and delete those that just don't do it for me. I don't even know how to use Photoshop. I should really get on that. All in all,  I probably choose four or five photos for any particular blog post. Yeah, I'm a perfectionsist. And those photos you see here on the blog are what I think are the best.
But that's just the photographing part. If only you could see the mayhem that is my kitchen when I'm putting together a recipe to blog about. There are bowls balancing in dangerous places, plates piled high, and pots on the stove almost burning. There is always a crazy amount of spoons and forks strewn everywhere. Did I mention the amount of dishes I need to wash when all is said and done? Yeah.
The beautiful thing about all of this is that it's all worth it. There's nothing that makes me happier or gets me more excited than taking some really great photos of delicious and healthy food and sharing them with the world. Even if only a teeny tiny percentage of the world ever actually sees them. What gets me motivated for each and every post is the fact that these pictures and recipes are sort of moments in time that get to be preserved and someday perhaps shared at family dinner tables. Or breakfast tables. Or at a desk in an office somewhere. And the food is making people happier and healthier. Or just more inspired to be healthier. The truth is, I love doing this. It makes me feel fulfilled. And it's worth washing all the dirty dishes. It really is.
This post goes out to every single food blogger out there who's balancing on their kitchen stools trying to get great pictures. Okay, maybe only I do that, but whatever. I admire your work more than you'll ever know. And keep doing what you do.
Today, I'm sharing  a recipe from the first food blogger I ever discovered. Her name is Heidi Swanson and she writes 101 Cookbooks, plus she's written two of my favorite cookbooks. She's been an inspiration to me since I first became a blogger and if I could have a fraction of the impact she's had on people's lives in the kitchen, then I'd be happy.  This recipe is really tasty. Plain and simple. And it just screams spring to me with it's vibrant green color. Broccoli pesto is genius, people. I could eat it by the spoonful. I changed Heidi's recipe a bit to fit my needs and tastes and that's reflected here. But the link above the recipe goes straight to the original on her blog.

Double Broccoli Quinoa (adapted from this recipe on 101Cookbooks)
3 cups cooked quinoa*
5 cups raw broccoli, cut into small florets and stems
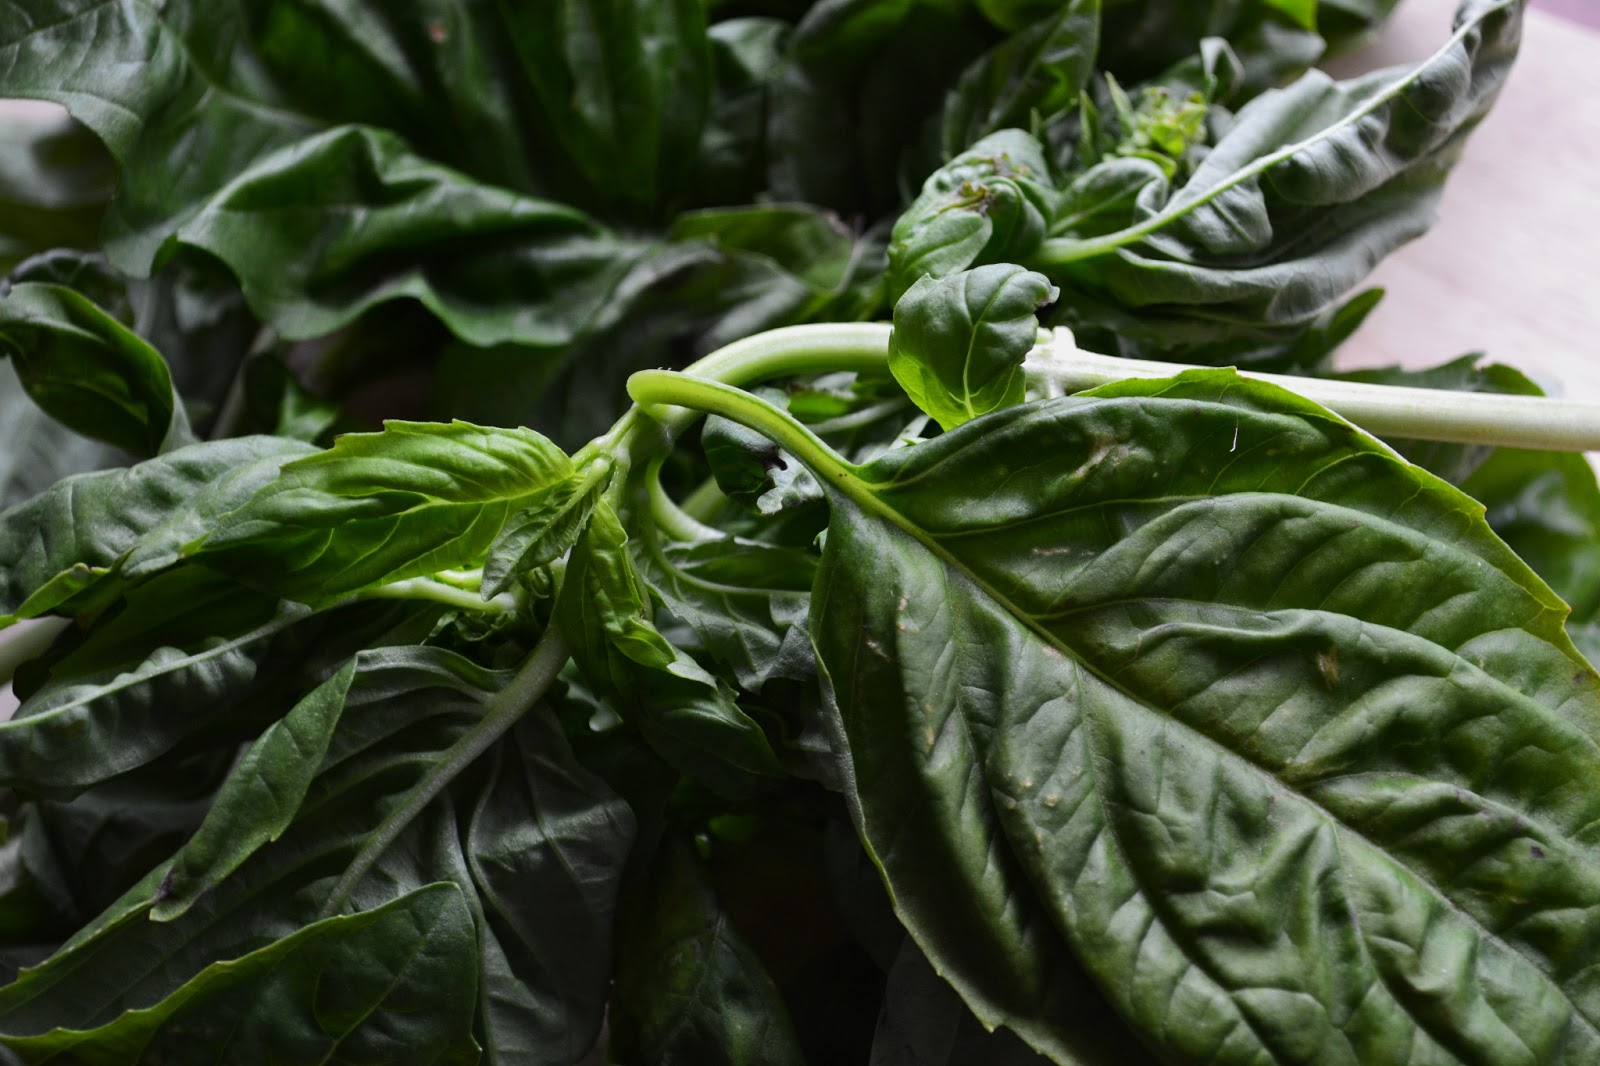
2 cups loosely packed basil
3 medium garlic cloves
2/3 cup walnuts
1/3 cup freshly grated Asiago cheese (Pecorino or Parmesan would work)
2 big pinches salt
2 tablespoons fresh lemon juice
1/4 cup olive oil
Optional (but HIGHLY recommended) toppings: slivered basil, sliced avocado, crumbled feta or goat cheese


1. Barely cook the broccoli by pouring 3/4 cup water into a large pot and bringing it to a simmer. Add a big pinch of salt and stir in the broccoli. Cover and cook for a minute, just long enough to take the raw edge off. Transfer the broccoli to a strainer and run under cold water until it stops cooking. Set aside.

2. To make the broccoli pesto, puree two to three cups of the cooked broccoli, the garlic, 1/2 cup of the walnuts, basil, cheese, salt, and lemon juice in a food processor. Drizzle in the olive oil and proccess until smooth.

3. Just before serving, toss the quinoa and remaining broccoli florets with about the broccoli pesto. Taste and adjust if needed, you might want to add a bit more salt or an added squeeze of lemon juice. Turn out onto a serving platter and top with the remaining walnuts, some sliced avocado, and basil.
Serves 4 - 6.

*To cook quinoa: rinse one cup of quinoa in a fine-meshed strainer. In a medium saucepan heat the quinoa, two cups of water (or broth if you like), and a few big pinches of salt until boiling. Reduce heat and simmer until water is absorbed and quinoa fluffs up, about 15 minutes. Quinoa is done when you can see the curlique in each grain, and it is tender with a bit of pop to each bite. Drain any extra water and set aside.
aside and let cool, then store in refrigerator. Bring to room temp again before using.


For more fabulous food and photos from Nourish The Roots, 
be sure to follow on Facebook, Instagram, and Pinterest

Tuesday, March 12, 2013

Homemade Lacto-Fermented Sourkraut


I'm back with another fermented vegetable! This time, it's a simple sourkraut. I wrote recently about my kimchi experiment, plus all the health benefits associated with fermentation. This time, I'm keeping it simple with a classic kraut. I've been on a fermenting kick lately, even making my own kombucha regularly, which is totally awesome (and will be a whole other blog post soon).
I've been so interested in making all things fermented that I actually took a class last week from an expert, the founder of Firefly Kitchens, Richard Climenhage. Firefly Kitchens is a small company based in Seattle that specializes in making authentic, traditionally fermented vegetables. Their products are sold at farmers markets and local co-ops both in Seattle and Portland.  Everything they make is made with local  produce and is incredibly delicious and super good for you. Right up my alley!
I've said it before and I'll say it again (and I'll probably say it again at some point...) that fermented foods, especially fermented vegetables, are one of the most important things that you can put in your body. The probiotics in these foods are better than any pill you can take and they will boost your health and digestion tremendously. Eating a bit of sourkraut, kimchi, or other fermented vegetable with every meal will drastically improve digestion and assimilation of nutrients in the body. And if you don't want to make your own sourkraut or kimchi just yet, luckily there are plenty of great local companies like Firefly Kitchens to make some for you. Just be sure you're getting these fermented foods in a health food store in the refrigerated section and that they are unpasteurized and raw.
Making sourkraut is possibly one of the easiest fermenting projects to undertake, besides pickles. The following recipe is the one that I've used in the past with a little adjustment based on what I learned from the class. Feel free to adapt the recipe by using purple cabbage, shredded carrots, beets, or any other vegetable. You can even add some caraway seeds to this classic kraut to give it that extra authentic flavor. Have fun with it!

Classic Sourkraut (from Firefly Kitchens)
Ingredients:
1 head of cabbage (3 quarts shredded)
1 1/2 tsp unrefined sea salt (Celtic sea salt, Pink Himalayan, etc...)

Equipment:
1 quart mason jar
large bowl

1. Peel off any old, discolored cabbage leaves.  Cut cabbage into quarters and thinly slice into long strips.

2. Place half of the sliced cabbage into a large bowl and add half of the salt. With your clean hands, massage the cabbage until it starts to release water. Add the rest of the sliced cabbage to the bowl with the rest of the salt and massage some more until the cabbage has collapsed a bit and when you squeeze it, water is released.

3. Put the cabbage into the mason jar and push down hard until the cabbage liquid (brine) rises above the compressed mixture. If there is not enough liquid to do this, make a salt water brine of 1 teaspoon salt dissolved into 1 pint of water. Add this brine to the jar until the cabbage is fully submerged.

4. Close lid tightly and allow to sit at room temperature for a least one week and up to six weeks for maximum flavor.

Notes:
-Keep the jar on a plate, as some brine may leak out if it gets high.
-If the brine level goes below the cabbage, add more salt water brine solution.
-Give at least one inch of space at the top of the jar to allow for expansion of gassing from the fermentation.


For more fabulous food and photos from Nourish The Roots, 
be sure to follow on Facebook, Instagram, and Pinterest

Tuesday, March 5, 2013

Roasted Root Vegetable and Quinoa Salad

It's beginning to feel like spring here in the Pacific Northwest. It's the first time in my life that I'm not experiencing a Northeast spring, and I can say it's a little different here. There are daffodils and crocuses and blossoming fruit trees in people's yards already! I just know that my peeps in New York are still waiting for the temperature to climb and the last of the snow to melt. To them, spring is still a ways away. So I guess I'm still feeling winter with all of you Northeasterners, and I'm still into the root vegetables. For now, at least.
This salad was put together on a whim after I picked up some pretty little beets at the farmers market on Sunday. Their vibrant colors reeled me in and I just couldn't resist. I roasted them along with some parsnips, carrots, and onions and tossed the whole mix with quinoa, walnuts, and greens. I wisked up a honey dijon vinaigrette and voila! A grounding, hearty salad to welcome the chilly misty air of early spring. I can imagine this salad being super delicious with some crumbled goat cheese over top, as well. Just a thought.
Root vegetables are incredibly delicious when they're slowly roasted, as the sugars within them caramelize and concentrate. I like roasting a bunch of root vegetables in the beginning of the week and then add them to salads throughout the week. They're a great way to bulk up any meal. And what's even better is that they're packed with nutrition at a very affordable price!
Roasted Root Vegetable and Quinoa Salad

For the Salad:
7 small beets, peeled and cut into cubes
2 large carrots, peeled and cut into cubes
2 large parsnips, peeled and cut into cubes
1 large onion, peeled and thinly sliced
3 cloves garlic, minced
olive oil for roasting
sea salt
1 cup walnuts, lightly toasted in a dry skillet
2 cups cooked quinoa (1 cup dry quinoa yields 2 cups cooked)
1 cup cooked chickpeas
1 large handful cilantro or parsley, roughly chopped
3 handfuls of mixed salad greens

1. Preheat oven to 350. Toss the carrots and parsnips with a few tablespoons of olive oil and a few pinches of salt. Spread them on half of a parchment-lined baking sheet. Toss the beets with olive oil and salt and put them on the other half of the lined baking sheet. (Keeping the beets separate from the carrots and parsnips helps to prevent all of your vegetables from turning red from the beets).

2. Combine the onion and garlic with some olive oil and salt and put them on a separate parchment-lined baking sheet. Put both pans in the oven and roast for about 45 minutes to an hour, or until the root vegetables are tender and the onions are soft. Remove from the oven and let cool slightly.

2.  In the meantime, combine the cooked quinoa, cooked chickpeas, salad greens, cilantro (or parsley), and walnuts in a large bowl. Add the roasted vegetables to the bowl and toss lightly just to combine. Serve on plates or bowls with lots of the delicious honey dijon dressing poured over top.

For the Dressing:
3 tablespoons dijon mustard
2-3 tablespoons white balsamic vinegar or lemon juice
2 tablespoons honey or pure maple syrup
4 tablespoons extra virgin olive oil
a few pinches of salt, to taste

1. While the vegetables are roasting, combine all of the dressing indredients in a bowl. Wisk until the dressing is emulsified. Alternativeley, add all the dressing ingredients to a small mason jar, screw the lid on tightly, and shake well. Taste the dressing and adjust to your liking (add more mustard, more honey, more olive oil, etc...) Pour the dressing over the finished salad and enjoy!


For more fabulous food and photos from Nourish The Roots, 
be sure to follow on Facebook, Instagram, and Pinterest