Wednesday, October 19, 2011

Garlic Dill Pickles


I have ventured into a whole new realm of healthy food preparation and it is so awesome. Ladies and gentlemen, I have successfully created my first batch of lacto-fermented pickles! And they are absolutely delicious and probably the easiest thing to make. Seriously, they're super easy. And they're super healthy, too! I went to the farmers market a few weeks ago and watched a woman do a demonstration about making these pickles. I've wanted to make these for awhile (reading food blogs makes you want to make a lot of things). But after learning how easy it truly was while watching the demonstration, I knew I had to do it immediately.
Now what is lacto-fermentation and how on earth are pickles healthy? Well,these pickles are made sour not by vinegar, but by natural beneficial bacteria. Lacto-fermentation happens when the starches and sugars in vegetables and fruit convert to lactic acid by a friendly lactic-acid producing bacteria. Basically, fermented vegetables will give you the same digestive and immune system boosting benefits of cultured yogurt with the added bonus of vitamins, which dramatically increase during the fermenting process. Lacto-fermentation is the old fashioned way of making pickles, and boy are these pickles tasty.
I realize that I should have posted this recipe a few weeks ago when cucumbers were abundantly in season, but you probably can still find some pickling cucumbers around. If you can't find any, just bookmark this recipe and make them next summer. I apologize for my lack of 'keeping with the seasons'.

I am definitely not a lacto-fermentation expert, so if you make these, consult google and other blogs for more expertise and detail. Just know that after a few days, the water will turn cloudy and foamy and the cucumbers will start to look a little dull in color. You may see bubbles and you may even see some slime form on the top of the water. Do not be afraid, though! As long as your pickles and brine smell good, you'll be fine. I was a little nervous when my pickles looked a little funny, but after researching and tasting them, I knew they were fine. They tasted fantastic. Now, if yours smell a little off, this probably means your brine is contaminated with some unfriendly bacteria, so toss them and try again.

Garlic Dill Pickles

4-5 kirby cucumbers (pickling cucumbers), washed very well and quartered lengthwise
1 small bunch of fresh dill, flowering dill, or dill seeds (not dried dill weed)
3-4 large cloves of garlic, sliced
1 tsp whole peppercorns
1 1/2 tablespoons unrefined sea salt or pickling salt (not iodized salt)
2 cups filtered, purified, or distilled water
1 quart size jar with lid, cleaned and rinsed very well

1. Put garlic, peppercorns, and dill in the bottom of the jar. Add the cucumbers vertically until they all snugly fit into the jar. Make sure they're in there nice and snug! Be sure there is about 1 1/2-2 inches of space between the top of the cucumbers and the opening to the jar.

2. In a pitcher or bowl, add the salt and water and stir very well until the salt has dissolved. This is your brine.

3. Pour the brine into the jar over the cucumbers until the they are completely submerged in brine. You don't want any cucumbers poking out of the brine. The salty water keeps bad bacteria from gorwing and promotes good bacteria to multiply.

4. Place the lid on the jar. Let the jar sit out on your countertop for at least 3 days. I made a great batch by leaving them our for 5 days. They were nice and sour. But time will vary and all you need to do is taste them to see if they're sour enough. When they're to your liking, put the jar in the refrigerator and they keep really well for quite awhile.


For more fabulous food and photos from Nourish The Roots, 
be sure to follow on Facebook, Instagram, and Pinterest

Tuesday, October 18, 2011

Roasted Butternut Squash Risotto


It's fall and it's squash season. So that means it's time to make butternut squash risotto.  I really needed this comforting bowl of risotto this week and it totally hit the spot. Now, I normally prefer to stick with whole grains when I cook. Arborio rice isn't exactly a whole grain. But how can I resist this starchy Italian rice that turns into a beautiful creamy bowl of goodness?  I've actually made a risotto with barley before, which was quite good, and I will be sure to share that with you soon. But in the meantime, go make yourself this indulgent meal. Pour yourself a glass of wine while you're at it.

Butternut Squash Risotto (serves 2 as a main dish and 4 as a side dish)

1 butternut squash, peeled and cut into 1/2 inch cubes
2 tablespoons olive oil
sea salt
6 cups vegetable broth
2 tablespoons butter
1 yellow onion, finely chopped
2 cups Arborio rice
1 1/2 cup dry white wine
1 cup freshly grated Parmesan cheese

1. Preheat oven to 375. Lay the cubed butternut squash on a baking sheet (I line mine first with parchment paper, making for an easy cleanup). Drizzle with olive oil and toss to coat the squash evenly. Sprinkle with sea salt. Bake for about 20 minutes or until the squash is soft.

2. Pour the vegetable stock into a saucepan and bring to a low simmer.

3. Meanwhile, in a separate large pot, saute the onion in butter with a pinch of salt until nicely softened. Then, add the rice and stir until it's coated in the butter, about 2 minutes. Add the wine. Pour yourself a glass while the bottle is open.

4. When the wine is almost fully absorbed by the rice, add a ladle-full of warm vegetable stock. Continue to stir until absorbed. Add another ladle full and repeat until all of the stock is used up and the rice is cooked through. If you need more liquid to cook the rice thoroughly, adding water will be fine.

5. Add the cubed butternut squash to the risotto and stir to combine. Stir in the Parmesan cheese and serve right away.


For more fabulous food and photos from Nourish The Roots, 
be sure to follow on Facebook, Instagram, and Pinterest

Saturday, October 8, 2011

Roasted Corn Pudding in Buttercup Squash

Do you crave something comforting? Something creamy, warm, and cheesy? But something that also isn't horribly bad for you? Enter this squash recipe which should satisfy all of those things. You see, instead of making a comfort food like macaroni and cheese, I made this squash concoction and it hit the spot.
And it also gave me the opportunity to use these pretty buttercup squashes from the market. I was attracted to their pretty skin and they were the perfect size squashes to serve this corn pudding. They're like little squash bowls! I love to stuff squashes like this with lots of different things and I know I'll be making different variations of stuffed squash a lot this autumn. The corn I used in the recipe was fresh off the cob and probably the last of the corn on the cob for the season. I just loved the creamy corn pudding in the sweet squash topped with a nice sprinkling of cheddar cheese. Perfection, I tell you.
Make sure your squash halves lay flat in the pan that you're using, or else the filling will just spill right out of them. Also, you'll probably have some filling left over, so you could either use more squashes or do like I did and put the pudding mixture in a small baking dish and bake it alongside the squash. Either way works.

Roasted Corn Pudding with Buttercup Squash (slightly adapted from Heidi at 101cookbooks)

2 buttercup or acorn squashes, cut in half lengthwise and seeded
1 tablespoon butter or olive oil
1 cup milk (preferably organic)
1 egg plus 2 egg whites
kernels from 2 ears of corn (roughly one cup)
1/2 cup chopped scallions
1/4 tsp sea salt
1 cup shredded sharp white cheddar cheese

1. Preheat oven to 375 degrees. Rub the orange flesh of the squash with butter or olive oil. Place cut side up on a baking sheet, cover with foil, and bake for about 45 minutes. You want to make sure the squash halves lay flat and not tilt, because later when you put the filling in, it will run out.

2. In a bowl, combine the milk, egg and egg whites, corn, half the scallions, and salt. Wisk well. Fill each squash half with the mixture and transfer back into the oven. (If you have leftover filling, bake it in a small baking dish sprinkled with cheese. It's a real treat.) Continue baking squash uncovered for 30-50 minutes longer, or until the squash has cooked through and the pudding has set. At the last minute, sprinkle the top of each squash with cheese and put it under the broiler just until the cheese starts to bubble and brown. Serve squash warm with the rest of the chopped scallions sprinkled over the top.


For more fabulous food and photos from Nourish The Roots, 
be sure to follow on Facebook, Instagram, and Pinterest

Tuesday, October 4, 2011

Cranberry Beans and Ribollita

 
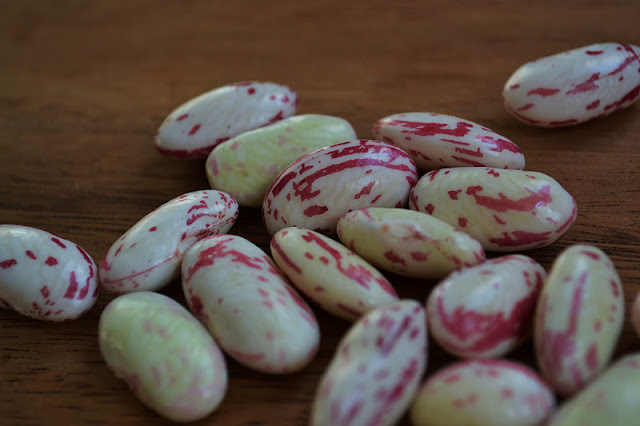
There's nothing more exciting for me than trying new foods. So you can imagine my excitement when I saw these gorgeous cranberry beans at the market and decided to use them in my all time favorite soup. It was my first time using fresh beans (as opposed to dried) and I fell in love. Look at these beans! They're just gorgeous. Call me weird, but when I was photographing them, I got really excited because they looked so damn beautiful.

 Sadly, after cooking the beans, they lose their pretty color and take on the look of a typical white bean. However, they taste great and cook so much faster than dried beans. And they were fun to remove from the pod, so overall it was a good experience and I'm definitely not disappointed.

This soup is just bursting with local and beautiful produce from the farmers market. These carrots had huge green tops, dirt still clinging on them, and the sweetest crunch I'd ever tasted in a carrot. I knew that they were just pulled from the earth. And the lacinato kale with its sexy dark green leaves is bursting with flavor and nutrition. Combine these vegetables together with some other basic ingredients and you get the Italian soup called ribollita. It's a thick and  hearty soup, which makes it filling enough to be a meal in itself. Ribollita traditionally has bread added to it to make it extra thick, but I opted out of that this time and just had some nice crusty wholegrain bread on the side.
Serve the soup with a drizzle of extra virgin olive oil and a shaving of fresh Parmesan or Pecorino Romano cheese and enjoy during this lovely autumn season when the air is getting crisp and the body longs for nourishment and warmth.

Ribollita

3 tbs olive oil
1 large onion, chopped finely
3 large stalks celery, chopped
3 carrots, chopped
4 cloves of garlic, minced
1  small can whole peeled Roma tomatoes (14 1/2 ounce can) or 3 large fresh tomatoes, chopped
2 cups shelled cranberry beans or cooked white cannellini beans
4 cups vegetable broth
1 bunch lacinato kale, chopped into thin strips
sea salt, to taste
Freshly grated Parmesan or Pecorino Romano cheese

1. In a large soup pot, saute onion in olive oil until softened. Add the carrot and celery and cook about 5 minutes.

2. Add the garlic and then add the can of tomatoes. With a wooden spoon, break up the tomatoes into small pieces (unless you're using fresh tomatoes, where you would already have them chopped before adding them to the pot).

3. Add the beans and broth and let simmer for 20-25 minutes or until the beans and vegetables are cooked. Right before serving, add the chopped kale to the pot of hot soup (the heat should be off). Stir the kale into the soup until it's nicely wilted and retains a bright green color. This is a very thick soup,so if you want to thin it out with more broth, you may. Ladle into bowls and drizzle with olive oil and a shaving of fresh cheese. Delicious!


For more fabulous food and photos from Nourish The Roots, 
be sure to follow on Facebook, Instagram, and Pinterest

Tuesday, September 27, 2011

Vegetable Barley and Bean Soup


 The summer is definitely coming to a close and I honestly don't know where it went. It seems like yesterday that we were anxiously awaiting our wedding in July and frolicking through Italy in August and now it's almost October. Damn, I want the summer back. So you can see why I'm squeezing every last bit out of the summer vegetable harvest, yet using it ways that will warm us up as we start feeling that autumn chill in the air. So here's this soup.

I'm so blessed to live within walking distance of an absolutely amazing farmers market that takes place every Saturday. It's become our weekend tradition to get up early and head on over to the market to pick up our fresh vegetables, fruit, herbs, and bread for the week. I love knowing that I'm purchasing the most wholesome food I can buy while also supporting our local farmers who work so hard. This past Saturday, I picked up beautiful cherry tomatoes, green beans, and fresh sage and thyme (among many other things) and figured I'd make a nice soup. We really enjoyed how it came out.

It was my first time using pearled barley in a soup and I think it was a great addition, although you could totally use brown rice or wheat berries. The white wine gives it extra flavor and all of the vegetables and beans make this soup filling enough to be a meal itself. And the leftovers were great, although you may need to add some water or broth to the leftovers because the barley soaked up a lot of broth. So if you're like me and not ready for the summer to end quite yet, here's a nice little soup to gradually welcome autumn. Well, to look on the bright side, autumn equals apple and squash season! How exciting!

Vegetable Barley and Bean Soup (adapted from Green Kitchen Stories)

3 tablespoons olive oil
1 small onion, diced
3 cloves garlic, finely chopped
2 large carrots, chopped into thin rings
2 large celery stalks, chopped
2 bay leaves
2 fresh sage leaves
1 teaspoon fresh thyme leaves
juice from half a lemon
1 cup white wine
6 cups vegetable broth (use more if soup becomes too thick)
1 cup pearled barley
1 zucchini, diced
10 cherry tomatoes, halved
2 cups fresh green beans
1 1/2 cups cooked cannelloni beans (I use dried cannellini beans that I've soaked overnight, drained, then    cooked in fresh water until softened, but you can also use a can, just make sure the beans are rinsed well.)
sea salt, to taste

1. In a large pot, cook onions in olive oil with a pinch of salt until they are nicely softened. Then, add garlic, carrots, celery, bay leaves, sage leaves, and thyme leaves. Cook, stirring often, about 2 minutes. Then add the white wine and stir for another 2 minutes.

2. Add vegetable stock and let simmer for 15 minutes. Then, add barley, zucchini, and tomatoes. Cover and let simmer for 20 minutes.

3. Add green beans and cooked (or canned) cannelloni beans and let simmer for about 8 minutes. Taste and adjust for salt. I used about a teaspoon of salt, but it depends on how salty your vegetable broth is. Serve the soup drizzled with olive oil and perhaps a dusting of Parmesan cheese.


For more fabulous food and photos from Nourish The Roots, 
be sure to follow on Facebook, Instagram, and Pinterest

Sunday, September 25, 2011

Chunky Tomato Salsa

So I realize I haven't posted recipes for complete meals lately. And I guess I'm continuing that trend by posting this recipe for salsa. But this stuff is so amazingly good and pairs so well with so many complete meals that it deserves a complete post dedicated solely to it. I promise to start posting some delicious meals soon. It's not like I haven't been cooking, so expect to see some good food coming soon.


I absolutely adore Mexican food, but I'm not a fan when it's greasy or fried. It doesn't usually have the healthiest reputation, I know. I always go for a vegetarian option when it comes to Mexican food. And honestly, when you make it yourself at home, it's so easy to make Mexican healthy without sacrificing any flavor. Check out my  black bean and quinoa burritos if you don't believe me.
Use this salsa on eggs, on burritos or sandwiches, or mixed in with some rice and beans. It's better than any jarred varieties of salsa I've tried and it's super easy to make. I've made it 3 times in that past 3 weeks, so I guess you can say we've been enjoying it on lots of things.

Chunky Tomato Salsa (makes about 2 cups)

3 large fresh Roma Tomatoes, diced
1/2 of a small red onion, finely chopped (use less if you prefer)
1 large garlic clove, finely chopped
juice of half a lime
1 small red chili pepper or jalapeno pepper, seeds removed and finely chopped (feel free to use more or less)
1 tablespoon tomato paste (optional, but  it makes the salsa texture great and gives it a rich tomato taste)
Lots of fresh cilantro, roughly chopped (I use about 3 tablespoons)
sea salt to taste

1. Put chopped onion, garlic and lime juice in a large bowl with a good pinch of salt.

2. Add the diced tomatoes, chili or jalapeno pepper, and tomato paste. Stir very well to combine. Add another good pinch of salt.

3. Add the cilantro and mix again. Transfer to a jar or another bowl and serve or keep it for up to 1 week in the refrigerator. And it gets even better after a few days of refrigeration as the flavors really meld.


For more fabulous food and photos from Nourish The Roots, 
be sure to follow on Facebook, Instagram, and Pinterest

Thursday, September 15, 2011

Basil Pesto


So what do you do when you have tons of basil? Like so much that all those basil leaves barely fit into your largest colander? Make pesto, of course! Pesto is literally one of my favorite things on the planet. I like it on pasta the best. I have fond memories of my dad making pesto in the summer from basil in his garden. We would eat it on spaghetti. Delicious. But close second is a mozzarella, tomato, and pesto sandwich on rustic whole grain bread grilled to perfection. It's also awesome drizzled onto some of my favorite soups like this one. Oh my goodness, my mouth is watering.
Pesto is traditionally made with pine nuts and that's just fabulous, but have you seen the price of pine nuts lately? Like, it's absolutely insane. So I make mine with walnuts and honestly, it's pretty great. I don't miss the pine nuts at all actually. And my bank account thinks it's great, too.

Basil Pesto

1 very large bunch basil, leaves removed from stems, discard the stems
1/4 cup walnuts
1/2 cup grated Parmesan or Pecorino Romano cheese (or a mix of both)
1 large garlic clove
pinch of sea salt, or more to taste
 1/4-1/2 cup extra virgin olive oil

1. Put the garlic clove and walnuts in a food processor and process until pasty, yet still retaining some graininess. Add the cheese and salt and pulse again.

2. Add the basil leaves (you may have to do this in batches if you have a lot of basil and depending on the size of the food processor). Pulse while drizzling olive oil through the feeder until you have a desired consistency. Some like pesto very creamy and some like it with a bit of texture. I like texture and lots of oil, so that's how I make mine.

3. Taste and adjust for salt and add more cheese if you'd like. Store pesto in an airtight container in the refrigerator for up to a week.

Unfortunately, pesto oxidizes very quickly and you lose the bright green color if you don't put enough olive oil in it. It also helps to put a nice layer of olive oil over the pesto in the container that you choose to store it in. The flavor is not affected by this oxidation, though. It still tastes fabulous, it just may not be super bright green.


For more fabulous food and photos from Nourish The Roots, 
be sure to follow on Facebook, Instagram, and Pinterest


Wednesday, September 14, 2011

Roasted Peppers

You can't beat the sweetness of roasted red peppers. An Italian antipasto platter is incomplete without them and they're awesome on a Caprese sandwich. Now, I've been eating store bought roasted red peppers for awhile now. I buy the ones that are in cute little glass jars that are marinating in some vinegar, salt, and olive oil...no bad ingredients and oh so tasty. Yet these here peppers are out of this world delicious and I don't think I'll ever need to buy them in the jars ever again. They're really simple to make and I've been putting them on sandwiches, in salads, pureeing them into my hummus, and just eating them by themselves. I can't think of a better way to use beautiful peppers from the farmers market. I used red, orange, and yellow sweet bell peppers and they were divine.
 Basically, all you need to do is put some whole peppers in to a hot oven for about 40 minutes until they're blistered and just starting to blacken. Then you take them out, cover with foil, and let sit until they're easy to handle. Then, those blistery skins will slip right off. You then remove the seeds and cut the peppers to your desired size. Marinate them in some olive oil, red wine vinegar, and garlic and you've got something special.

Roasted Peppers (adapted from Deb at smitten kitchen)

Sweet Bell Peppers (red, orange, yellow, or a mix of all three)
red wine vinegar
extra virgin olive oil
sea salt
1 clove finely chopped garlic (optional)

1. Preheat oven to 400 degrees. Put whole peppers on a foil lined baking sheet and bake for 40 minutes, or until they're blistery and really wrinkled and starting to turn black. At about the 20 minute point, turn the peppers with tongs so that they evenly roasted.

2.Remove from the oven and cover them with a piece of foil, making sure that they're nicely covered with no holes for escaping steam. Let them peppers sit all wrapped up for about 30 minutes or so.

3. Remove the foil and peel the peppers. The skins should slip right off. Take the stems off and remove the seeds. Do not rinse the peppers with water, because you will lose all of their flavorful juices. Cut (or just tear them like I do) the peppers to your desired size and serve them or keep in a jar with a 1-2 tablespoons of red wine vinegar, some chopped garlic, and a pinch of salt. You may drizzle them with olive oil before serving, but I don't recommend refrigerating them with olive oil on them because the olive oil will solidify from the cold. They keep up to a week in the refrigerator in a covered jar.

For more fabulous food and photos from Nourish The Roots, 
be sure to follow on Facebook, Instagram, and Pinterest

Saturday, September 3, 2011

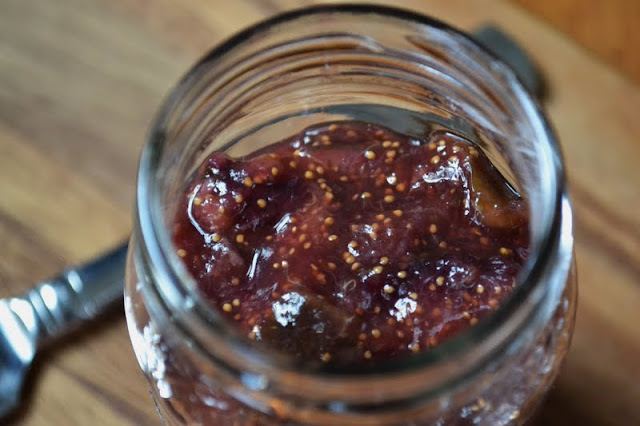
Homemade Fig Jam from Mark Bittman

I have decided that someday, wherever I live, I want a fig tree in my yard. I want to be able to pick those lovely fruits whenever I want, just like I did in Italy. You see, we had a fig tree outside of our apartment in Italy and by the time we left, I don't think there was a single ripe fig on that tree because of me. Every time I discovered a nice big juicy one hiding behind one of those cool shaped leaves leaves, I got so excited.

So you can imagine my excitement yesterday when I went to the market and discovered a whole container of perfectly ripe figs just calling my name. I just couldn't say no to their beauty. I brought them home and ate a few with some brie cheese as an afternoon snack and dreamed of something I could use them for. I suddenly thought of how lovely a fig jam would be on a nice slice of toast for breakfast. Soon enough, I discovered this simple recipe on the New York Times site. I left out the refined sugar and replaced it with local raw honey and in less than twenty minutes, I had this fig jam.


Fig Jam (adapted from Mark Bittman of The New York Times)

1 pound fresh figs, stemmed and chopped
4 tablespoons honey (more or less to taste)
1 teaspoon pure vanilla extract
1-2 tablespoons water

1. Combine the figs, honey, and vanilla in a small saucepan. Bring to a boil and add water if it becomes too thick. Adjust heat so mixture bubbles steadily. If it looks too soupy, use a higher heat to reduce it; if there is not much liquid, use lower heat to avoid burning. Cook, stirring occasionally, until mixture is liquid but thick. Turn off the heat. It will thicken up some more once you put it in the refrigerator.

2. Let cool a bit and put in a mason jar or other covered container. Refrigerate for up to a week.


For more fabulous food and photos from Nourish The Roots, 
be sure to follow on Facebook, Instagram, and Pinterest

Friday, September 2, 2011

Heirloom Tomato Salad


Although summer is coming to an end, there are still tomatoes growing on the vines, so I'm taking every opportunity to enjoy them in all of their deliciousness. It's still quite warm outside, so a quick raw tomato salad is a perfect side dish that's really refreshing.


Heirloom tomatoes are really special. I love admiring their shapes, colors, and  flavors. Their flavors are even more pronounced in this salad where they're uncooked, lightly seasoned, and accented with some red onion, raw garlic, a nice zing of vinegar, and some olive oil. Oh, and some fresh basil on top of course if you have any.
Tomatoes remind me of our recent honeymoon in Italy and that makes me happy and sad at the same time. Happy to be reminded of such a beautiful place and beautiful memories, but sad because I long to go back. So, I guess that just means I'm going to sit and enjoy this here tomato salad, close my eyes, and pretend I'm there.

Heirloom Tomato Salad
2 pounds of tomatoes-any size, shape, or color you can find
2 cloves of garlic, minced
1 quarter of a red onion, sliced very thinly
2 tablespoons red wine vinegar
3 tablespoons extra virgin olive oil
Pinch of sea salt
Fresh basil leaves

1. Cut the tomatoes into approximately 2 inch pieces. I like to cut them fairly large in order for them to hold their shape. Put them in a large bowl.
2. Add the garlic, onion, vinegar, olive oil, a pinch of sea salt, and some torn fresh basil. Toss to coat the tomatoes and serve.


For more fabulous food and photos from Nourish The Roots, 
be sure to follow on Facebook, Instagram, and Pinterest

Wednesday, August 24, 2011

Rustic Whole Wheat Raspberry, Plum, and Peach Crostata


We went raspberry picking this past weekend. Raspberry picking is one of my favorite late-summer things to do. In addition to the two quarts of raspberries that we picked, we also grabbed some freshly picked plums and peaches from the farm. I knew I had to bake something with all of these beautiful fruits, and a summer fruit crostata sounded perfect.
I know I've mentioned my aversion to baking before. One of the things I have always been especially afraid to bake is pie crust. It seems as if there's a precise way to make a perfectly flaky crust, and honestly, it seems pretty complicated. I figured that I would muster up some courage and make a crust for this lovely fruit, but instead of the typical (and intimidating) pie, I decided to make this rustic crostata. I really enjoyed the way it came out. And, I must admit, it really wasn't all that hard. Or intimidating. It was actually quite fun.
I used whole wheat flour for the crust. Granted, it wasn't as flaky or as pretty as a typical white crust, but I was perfectly content with it. I like baking with whole grain flours, and I wasn't going to make an exception with pastry dough. And you can be creative with the fruit. I'd love to make an apple crostata when the apples are ready and I know a mixed berry crostata or even a strawberry rhubarb one would be fantastic.
I loved the look of the crust folded over the fruit, so effortless and so natural. It's not a fussy dessert, it doesn't have to be perfect. It's precisely the type of dessert that I appreciate.

Whole Wheat Raspberry, Plum, and Peach Crostata
(makes one 8" crostata)

For the Crust:
1 1/2 cups whole wheat flour
1/2 teaspoon salt
2 tablespoons raw sugar
1 stick cold, unsalted butter, cut into cubes
6 tablespoons ice water (more or less, depending on the humidity outside and the type of flour used)

For the Filling:
1 peach, thinly sliced
3 plums, thinly sliced
1 1/2 cups raspberries
1/4 to 1/2 cup sugar, depending on your taste and the sweetness of the fruit
Heavy cream, for brushing the crust and for making fresh whipped cream
Additional raw sugar, for sprinkling
Additional butter, for topping the fruit before baking

To Make the Crust:
1. Combine the flour, salt and sugar in the bowl of a food processor and pulse.  Add the cold butter and pulse until the butter is the size of peas.  Slowly add the ice water, 1 tablespoon at a time, pulsing, just until the dough starts to come together. 
2. Gather the dough together and flatten onto a piece of plastic wrap.  Wrap the dough and chill in the refrigerator for 2 hours.
3. When you are ready to use the dough, roll the entire dough into one large circle.  Place the rolled tart dough onto a  parchment-lined baking sheet.

For the Filling:
1. Preheat oven to 425 degrees. Combine the sliced peach, plums, and raspberries.  Add the sugar and 1 tablespoon of flour.  Mix gently and spoon the fruit mixture into the center of the tart dough leaving approximately a 3-inch border.  Bring the dough up over the fruit and pleat the dough (see photo above).  Brush the pleated edge with heavy cream and sprinkle with raw sugar.  Scatter small shards of butter over the fruit. 
2. Bake crostata in the center of the oven for approximately 30 minutes, or until crust begins to turn a golden brown. 
3. Remove from oven.  Cool for at least 15 minutes to make sure the fruit sets and serve with fresh whipped cream.


For more fabulous food and photos from Nourish The Roots, 
be sure to follow on Facebook, Instagram, and Pinterest

Monday, August 22, 2011

Stuffed Tomatoes


Nothing beats a home grown tomato. The warmth of a just-picked tomato and its sweet juiciness is one of life's simple pleasures this time of year. I love seeing all of the different types of heirloom tomatoes at the farmers markets and I also love seeing them growing in my dad's humble little garden. And using them in the kitchen is what I love the most. I make fresh tomato sauce and tomato salsa and tomato salad a lot. I even made a killer roasted tomato soup just a few days ago. But today I tried something new with these big red guys: stuffed tomatoes. They're incredibly simple and they really highlight the flavor of the tomato. So if you find yourself with too many tomatoes and you're tired of making the same old thing with them, try these!

Also, be wary of store bought breadcrumbs. Breadcrumbs sound simple, but take a look at the ingredient list and oftentimes you'll see tons of chemicals, preservatives and hydrogenated oils listed. So, seek out a brand that is natural and free from all of these bad things, or you can eaily make homemade breadcrumbs. Better yet, use whole wheat breadcrumbs instead of the usual white.


This recipe is a little rough because it really depends on the size of your tomatoes and how many you're making. This recipe makes 2 medium sized stuffed tomatoes, but play around with the ratios if you make more of if you use really big tomatoes. 

Stuffed Tomatoes 
2 medium sized tomatoes
1 1/2 cups bread crumbs (I used plain whole wheat bread crumbs, see important note above)
1 large clove of garlic, very finely minced
Fresh basil leaves (maybe 6 leaves or so), finely chopped (or you use a tablespoon of dried basil)
1/2 cup freshly grated Parmesan cheese
Pinch of sea salt (or more to taste)
1 tablespoon olive oil, plus more for drizzling3 tablespoons shredded mozzerella

1. Preheat oven to 375 degrees. Slice the tops off of each of the tomatoes to remove the stem. Then, with a spoon, gently scoop out all of the seeds and watery pulp. I say do this gently because you don't want to tear the tomatoes or poke a hole in them. Discard the watery pulp and seeds (unless you think of something good to do with it).

2. Drizzle the tomatoes with olive oil and coat them all over. You can even put some inside the tomatoes if you want. Then set the tomatoes in a small baking dish

3. In a bowl, add the breadcrumbs, garlic, basil, Parmesan cheese, salt, and a tablespoon of olive oil. Mix well with a fork.

4. Now, stuff each tomato with the breadcrumb mixture and top each with shredded mozzarella and more Parmesan if you'd like. Bake for 30 minutes or so until the tomato skins are nice and blistery. Let cool briefly before serving.


For more fabulous food and photos from Nourish The Roots, 
be sure to follow on Facebook, Instagram, and Pinterest

Thursday, August 18, 2011

Whole Wheat Blackberry Muffins

I have to admit something. I really don't like baking all that much. I mean, I like freshly baked goods. But there's something about all the measuring and mixing and equipment that's typically involved and oftentimes unavoidable in baking. Maybe it's the all important precision that I don't really enjoy. I prefer the simple, no-fuss recipes when it comes to baking. Nothing fancy. I leave the fancy stuff to my sister. She's the pastry chef of the family. But in any case, my new husband really likes baked goods and I can predict that my usual avoidance of baking may not go over well in our household. At least I have someone to bake for now, and perhaps I will begin to love it. I'm willing to give it a chance.
I made these muffins recently and I really enjoyed how they came out (so did he). What I liked about them was that all the ingredients were basically put in one big mixing bowl and no electric mixer was required. What I really liked about them was the fact that they were whole wheat, made with lovely plump antioxidant-rich blackberries, and topped with the all-important raw sugar crust. In case you haven't read about my obsession with sprinkling raw sugar on practically every baked good I make (well, the few that I make) check out  my banana bread recipe.
Anyways, these are great muffins. They're easy to make, healthy, and easily adaptable. Make them with blueberries or raspberries and I'm sure they'd be wonderful. I know I'll be making them many more times. And you can be sure that I'll be expanding my dessert-making skills and creating other delectable items in the near future.

Whole Wheat Blackberry Muffins  
(makes approximately 10 muffins)

The blackberries I used were absolutely huge so I had to cut them up into pieces about the size of blueberries, so keep that in mind if you use large blackberries.

1/2 cup raw sugar, plus more for sprinkling on top
5 tablespoons melted butter
1 egg
3/4 cup plain yogurt
1 teaspoon lemon zest, preferably from an organic lemon
1 1/2 cups whole wheat flour
1 1/2 teaspoons baking powder
1/4 teaspoon baking soda
1/4 teaspoon salt
3/4 cup blackberries, cut up if necessary (see note above)

1. Preheat oven to 375 degrees. Line a muffin tin with paper muffin liners. This recipe makes about 10 muffins, so use 10 liners.

2. In a large mixing bowl, add the sugar and melted butter and mix really well. Add the egg and beat well until it's all incorporated.

3. Add the yogurt and lemon zest. Mix well again.

4. Put flour, baking powder, baking soda, and salt in a sifter (or put in a separate bowl and stir it all to combine) and sift half of the dry ingredients over the wet mixture. Mix, and then sift the rest of the flour mixture over the wet ingredients and stir the thick batter just until the flour disappears.

5. Gently add the berries. Since I used cut up blackberries, I tried really hard to gently fold them in so I wouldn't end up with blue muffins. The batter turned a bit blue, but as you can tell by the photos, they still look nice.

6. Use an ice cream scoop to fill the muffin cups about 3/4 of the way full. Then sprinkle them with as much raw sugar as you like. Bake them for about 25-30 minutes until the tops are lightly golden. Remove from the oven, let cool briefly, and enjoy.


For more fabulous food and photos from Nourish The Roots, 
be sure to follow on Facebook, Instagram, and Pinterest